
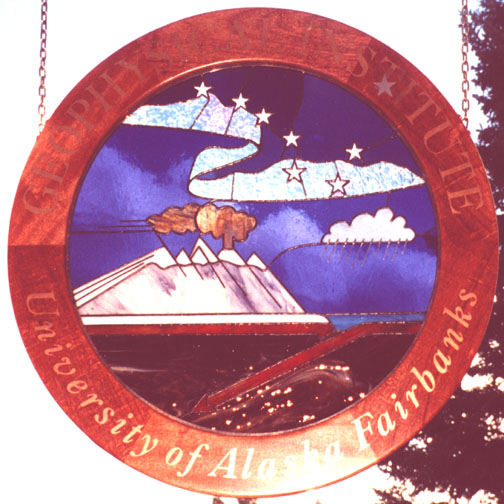
Over the years I've envisioned many creations that have involved accents or detailed linear features that I haven't had a means to achieve. One such project that had significant appeal was to render the Geophysical Institute logo in stained glass. The eventual results were satisfyingly successful. You can see and read a bit about it on one of my web pages: "http://www.ElvesOfEster.com/GIlogo.html". The photographs don't do either the glass or the frame justice, but the main one shows the effects of directional lighting on the polished mahogany, which is actually a uniform color cut from the same board. But that's another story.There were a few problematic linear features of this logo, some could be resolved through different glass techniques. The worst, however, was that the forty-seven letters around the edge, "Geophysical Institute University of Alaska Fairbanks" are an integral part of the logo and couldn't be ignored.
I thought about the problem of the letters for two years and researched and considered many options. The simplest solution would have been to paint them onto the frame, but even though I enjoy painting I couldn't stomach that idea. Early on I found that a local sign artist, Glen Pardy and his Vital Signs (907-479-7999), could do a fine quality routing job, so cutting the letters wouldn't be a problem. Sandblasting was another intriguing option. So was inlaying glass letters, but it left the problem of islands within letters like "o". Then, following up on earlier methods I'd used, I investigated metals with low enough melting temperatures to inlay into wood. They turned out to be either highly toxic (e.g. cadmium) or expensive (e.g. indium alloy), or both.
Exhaustive searching on the Web turned up information on the cold-cast bronze technique for sculptures. This led to quite a bit more research on and experimentation with available resins, primarily epoxies, polyesters, and urethanes.
The method I can now recommend wholeheartedly is filling routed, or carved, areas with bronze, brass, copper or aluminum powder mixed with urethane resin. There are lots of different urethane resins available. The one I liked the best was Synair's Por-A-Kast Mark 1 which is a two part, cream colored resin that's mixed 1 to 1 by volume which makes it very easy. I found that the cream colored stuff resulted in a better bronze finish than the clear resins that I tried and urethane is superior to polyester or epoxy in many ways.
You can read more about Synair's products, including their metal powders at: "http://www.synair.com/products/". Their dark bronze is a true bronze (copper/tin) and their light bronze, which I used, is actually brass (copper/zinc). Other sources of related products can be found through one of my links pages at: "http://www.ElvesOfEster.com/resins.html".
The basic inlay process that I used is this. I constructed a hexagon out of 3/4" mahogany. I had Glen at Vital Signs route it into a 31" diameter circle and route out the 47 letters to a depth of about 5/32" using a 1/16" router bit on a computer controlled router table. You'll notice that the font used was Times Roman with nice, finely detailed serifs. I then mixed up the resin and powder in paper cups and filled the letters. To avoid spillage and contamination, I had two paper cups, each half filled with one part of the resin with its own plastic teaspoon. I put two spoonfuls of one part into a new paper cup and mixed it thoroughly with two spoonfuls of brass powder. I then added two spoonfuls of the other part and one more spoonful of brass and mixed well. I then spooned the rather thick goo into one letter at a time, helping it in with a toothpick as necessary. I overfilled the letters as much as I could without too much spreading beyond the letters' edge over the surface. This was usually about 3/32" to 1/8" high. The reason for so much overfilling is that the metal powder settles, leaving the top of the hardened resin without enough left in it for a good, or even, metallic finish. This effect of gravity is a benefit for cold-cast sculpture, but a potential problem for inlay work.
The Mark 1 resin sets up very quickly (in a few minutes) which is why such small quantities are mixed at one time. It was time and volume enough to do three or four letters with each batch without much if any waste. Filling all 47 letters took under 3 hours. Four cautions are in order. First, the measurements need to be as accurate as you can get with a plastic spoon or the resin won't cure. I'd practiced enough that this wasn't a problem on my actual project. Second, don't push the setting time of the resin or go back and add to already filled letters. Fill each letter right the first time, or there will be noticeable lines in the metallic finish due to the different densities of metallic powder. Third, use a fresh paper cup for mixing each new batch and very promptly and completely wipe off all the resin from your mixing spoon, or use a new one. Finally, even though the urethane is odorless, the catalyst's fumes are toxic so use this stuff in a very well ventilated space.
After waiting at least an hour (overnight is better) I used 80 mesh sandpaper on a Dewalt dust-free orbital sander to remove almost all the excess inlay material - to the point where there's a bit of feathered "flash" around the edges of each letter. The stuff is quite hard, but it sands very easily so this is a satisfyingly fast process. As always, wear a real dust mask. I then used 150 mesh to bring everything truly flush. At this point I mixed up another batch of resin and filled several little pits caused by air bubbles, let it cure and re-sanded with 150 mesh paper. I then gradually worked my way down with 220, 320, 500 and finally 500 mesh as for any fine wood project.
To fellow crafts people I'll admit to one of my known errors on this project. In my hurry to meet a deadline, I finish sanded the surface before routing in a star that overlapped (cut into) one of the letters prior to filling it with aluminum/resin. When I sanded the star down I failed to carefully finish-sand it and the surrounding area in a uniform direction. The metal is even more sensitive to this than the wood, such that light is reflected differently off part of the letter containing the star. Otherwise, the overlapping aluminum and bronze inlay was quite successful and effective.
I finished this frame with about five thin coats of water-based polyurethane, since it should never be outside anyway. I had originally planned to have a purple frame, since that's the traditional coloring of the logo. My early tests routing purpleheart found it to be too brittle for such precision routing - it chipped too much. The alternative of using purple, or any other, stain on the mahogany didn't work out either since it discolored the urethane resin in the inlay. I didn't have time to experiment further for this project, but I think that I might be able to get around this by using extra fine steel wool on the inlay after the stain is applied. I hope so, since there isn't as much contrast between the natural mahogany and the brass as I wanted. Though the polished mahogany is beautiful, in hindsight I think maybe I should have used walnut, just to get an awesome contrast. For this glass panel though, which has dramatic and dynamic features (e.g. the dichroic aurora) that photographs just can't catch, the more subtle lettering works quite well.
In summary, I encourage you to try this "cold-inlay" technique. There's an elegance about it that I haven't seen in other alternatives. It's quick, easy, and inexpensive - well worth the effort. Its versatility lends itself to creative possibilities well beyond simple letters.
Visit my other Stained Glass Artwork & Mosaic Mortar Material Matters pages for lots of links to resources, manufacturers, suppliers & studios:
- Mosaic Forums, Resources & Recommended Books
- Links to more than 100 Mosaic Artists & Studios
- My Main Mosaic Mortar Material Matters page
- Mosaic Mortar Formula and Instructions
- Mosaic Mortar Component Links
- Pigments of All Types
- Glass, Ceramic & Stone Tile & Stone Inlay
- Resins, Reinforcing, Inlay & Radiant Heating Systems
- Stained Glass Forums & Resources & Recommended Books
- Links to more than 500 Stained Glass Artists & Studios
- Soldering Tips & Remarks on Soldering Lead-Free
- The Sonafrank Family's Slot Car Racing Fun
- Links to search engines that put the world on your desktop
- Politically Relevant Material , including Great Poetry & Real Spaghetti
Email comments (e.g. links I should add) to sonafrank@ElvesOfEster.com
or call 907-474-8831(H), 907-474-7277(W).
Please note, I'm in Alaska so there's a time difference.
Visit my Geophysical Institute page© Copyright Cole Sonafrank 1990-2000